Since I had such a large response on the French script desk, I have done a tutorial on how I did it. The desk is HERE.

I first did google search of french script images. This is the image I found online that I liked and it is pined on my Pinterest board found HERE.
I first did google search of french script images. This is the image I found online that I liked and it is pined on my Pinterest board found HERE.

I then printed it out and enlarged it 200% to get my desired size. When you enlarge it you will only get a section of it on your paper, so you will have to move your paper around on your copier to get different sections.
I have done a small sign for you all to demonstrate how I did the top of my desk.

Use a pencil on the back side.
Turn it over and trace your image.
You will then see it on your piece.
A little tip: notice how if you just follow the paper to paper you will get a straight line of words on the right? On the left I didn't trace the "full" line to stagger the letters. If you line one side up, I would stagger the next if that makes sense.
Then go back and put in the word or words you want.

without the words
with the words
I used an artist brush for the next part. Size 4050 Script


You can go back and erase any pencil marks left behind.
TIP: the base paint I used was a Semi-Gloss; it doesn't make for a good base. When I went to erase the pencil marks it smudged more than "come off" and your next layer of paint (mine was red) won't adhere to the semi-gloss. I just went with it and waited a day for the paint to dry more and rubbed of the pencil with a wet paper towel. But the first time I went to wipe it the red just came right off!
Stick with a flat paint.
You would think I already knew this, and I did I just didn't think about it since the only paint that I had on hand in white was Semi-Gloss.
WELL, I couldn't just stop there! I need more Christmas signs.
Printed out Noel to the size I wanted and did it all over again.
TIP: hold it up to a window and color only the area that you need to.
AND it needed a little something more......
Pine cone pieces!! I had some from last year that I never got around to using and I added an acorn cap to the center. Played with the arrangement first though.

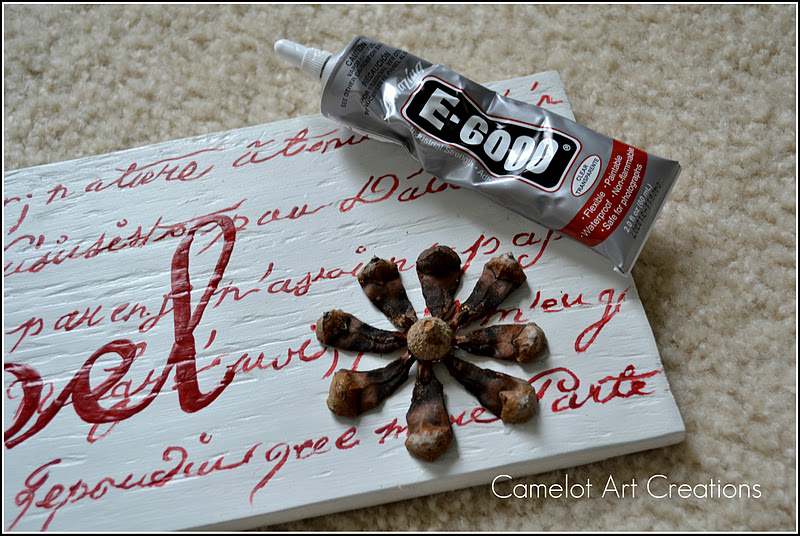
Glued into place with E-6000

I love using nature to decorate for Christmas! I brought back some pine branches from my mother's house that we cut down over the weekend. I wish I would have brought more!!! I'll be sharing pictures of ALL the work I did while I was there...haha, Love you MOM!


Stay tuned in, my vintage music sheet books came in yesterday and I have SOOO many things that I will be making over the next month.

If you don't want to make a sign I will have one listed in my Etsy shop:)


Linking to:


Beautiful sign! Thanks for the instructions, I never thought of using pencil on the back to do a transfer! I'm your newest follower, and hopefully you will see a sign post from me soon!
ReplyDeleteThanks again!
It turned out awesome Desiree! I saw from your Pinterest that you are from Orlando - I live in Palm Coast, FL - only an hour away. Small world!
ReplyDeleteKelsey
http://www.poofycheeks.blogspot.com